Firing Pottery Using
Pyrometric Cones
How to Make Homemade Clay Cone Packs
Learn how to use pyrometric cones in
firing pottery.
Also learn
how to make clay
cone packs for firing your
clay pot projects
About Pyrometric Cones
PYROMETRIC CONES- are specially formulated cones of clay material designed to melt after they have experienced a certain amount of "heat work".
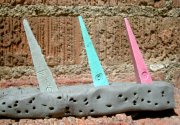
Cone pack before firing. The different colors are for different temperature cones. They are also stamped with the cone number.
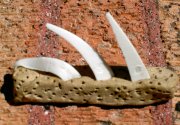
Cone pack after firing. The lowest temperature cone has melted.
Heat work is a combination of temperature and time. Therefore, a cone fired over a longer time can melt at a lower temperature than a cone fired over a shorter time.
Cones are place inside the kiln with the pottery. Because they measure both heat and time exposed to heat, they provide a very accurate measurement of the amount of heat the pots have absorbed.
Here is a list of the cone numbers from lowest temperature to highest: 022, 021, 020 ,019, 018, 017, 016, 015, 014, 013, 012, 011, 010, 09, 08, 07, 06, 05, 04, 03, 02, 01, 1, 2, 3, 4, 5, 6, 7, 8, 9, 10.
Notice how the lower temperatures have a "0" in front of them. Higher number = lower temperature. On the other hand, the higher temperatures don't have the "0". Higher number = higher temperature.
Cones come in 3 main variations: large cones (for placing upright in the kiln), small cones, and bars (for use in kiln sitters). A kiln sitter holds a small cone between three trigger arms. When the cone melts, the arms drop and triggers the kiln to turn off.
How to Make Homade Clay Cone Packs
Kiln sitters are not fool proof. Sometimes they don't trigger, so they need to be monitored. This can be done using a cone pack.
A cone pack is made up of a block of clay 2cm x 2cm x 10cm long. Three "witness" cones of different temperatures are placed in the clay so you can monitor the progress of the firing. The cone pack is then placed inside the kiln where it can be seen through a peep hole.
If you are firing a kiln to cone 5, you would line up the cones, cone 4 first, then cone 5, finally cone 6. The first one is called the "guide" cone. When this cone melts, it tells you that you're getting close.
The second is called the "firing" cone. When it melts, your firing is complete. If you are using a kiln sitter, the small cone or bar should melt at this point and trigger the kiln to turn off. If not, you would turn the kiln off manually, or begin a "soaking" period if it's a glaze firing.
The third cone is called the "guard" cone or "safety" cone. This cone should not melt during the firing. If it does melt, that means that the kiln has "over fired" or fired too hot for too long.
A couple of final tips:
1) Remember to check the zeros on your cones so you get the right temperature. Cones with zeros are lower in temperature than cones without zeros.
2) Be sure to make your cone pack at least 2 hours before firing and poke it full of holes so it can dry quickly. If you forget, you run the risk of your cone pack exploding during firing.
3) Make sure you can see your pyrometric cones through a peep hole before you start firing. Also use proper eye protection when looking into a kiln that is firing.
As always, thanks for reading and Happy Potting.
Return From Pyrometric Cones
To Firing Pottery
Return From Pyrometric Cones
To Pottery on the Wheel Home
Enjoy this page? Please pay it forward. Here's how...
Would you prefer to share this page with others by linking to it?
- Click on the HTML link code below.
- Copy and paste it, adding a note of your own, into your blog, a Web page, forums, a blog comment,
your Facebook account, or anywhere that someone would find this page valuable.


