Clay Pot Projects:
Trimming on the Wheel
Trimming- The process of carving your clay pot projects while they are spinning on the wheel.
If you look at almost any tableware, whether it be a paper cup or a porcelain plate, you will see a small rim on the bottom of the container.
This small rim is the foot.
Trimming is how you add a foot to a bowl.
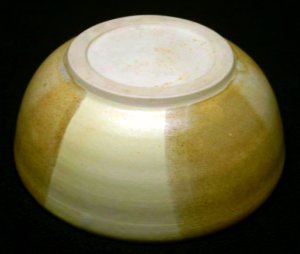
The foot helps the bowl to sit level on a table.
It also removes excess clay and weight from the pot.
A good example of this is in trimming the top of a lid.
In this pottery lesson we'll look at both how to trim a lid and how to trim a foot.
They both start off the same way, with re-centering the clay pot projects on the wheel.
First, a note on drying the pot.
Step 1 - Drying to Leather Hard
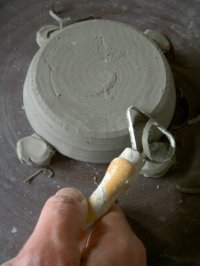
The very first thing you must do is dry your clay pot project until it is leather hard.
Leather hard is just what it sounds like. Your pot should be like the leather in a shoe, slightly soft and pliable, but not wet and sticky. This is important.
If your pot is too dry, carving will be difficult and you will be scraping hard clay and dust off your pot. It will dull your tools and it isn't a lot of fun.
If your pot is too wet, the trimmings will still be sticky. They'll stick back onto the pot and make a mess. This isn't a lot of fun either.
However, if your pot is just right, the trimmings will peel of in beautiful little spirals. They will curl off and away from your pot. Your tool will cut smoothly, and you will really enjoy trimming your pottery.
Step 2 - Recentering
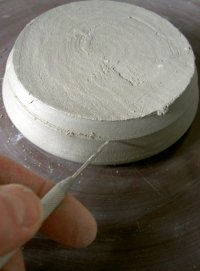
Now that your pot is leather hard, it's time to recenter it on the wheel.
To recenter it, place the pot upside down on a clean wheel or bat. Place it as close to centered as you can. Then, start the wheel spinning slowly.
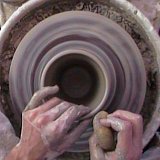
Using a clay needle tool gently move the tool toward the pot until it touches the pot near the base, as shown in the photo. Notice how the needle is pointing with the spinning of the wheel (the wheel is spinning counter clockwise).
This is very important to prevent the needle from stabbing into your pot. You just want the needle to graze along the side of the pot.
When the pot is centered, you will be able to scratch a perfectly even line all the way around it while the wheel spins.
If the pot is off center, you'll notice that the needle doesn't scratch all the way around the pot. It will only scratch on one side. This tells you to which side your pot is off center.
Allow the needle to scratch just a little bit, then stop the wheel. Rotate the wheel until the scratched portion is facing you. Push the pot gently away from you to move it further toward being centered.
You may have to move the pot several times in small increments before your scratch mark goes all the way around the pot. It takes some practice, just like centering clay for throwing.
Step 3 - Anchoring the Pot
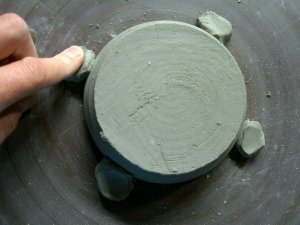
Once you have your pot centered, you need to anchor the pot to the wheel.
Take a small wad of clay and break it into four cherry-sized pieces.
While holding the pot in place, gently press the clay balls down against the wheel along side the pot.
Take care not to press into the side of the pot too much. This can distort your pot or push it off center.
Continue until all for balls of clay are secure. Then recheck your pot to make sure it is still centered. This can be done simply by spinning the wheel and holding your finger alongside the pot touching it lightly while it spins.
Step 4 - Trimming the Pot
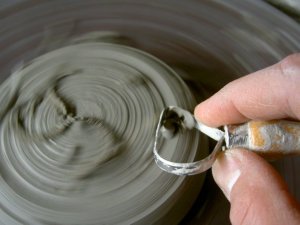
Now the fun begins. Start the wheel spinning.
Using a clay carving tool, begin to gently carve away thin layers of clay from the surface of your pot.
If you are trimming a lid, you'll be shaping the clay to suit the vessel that the lid belongs to. This could be rounded, squared off, or pointed on top.
Use the smaller surfaces of the tool, removing the clay in thin layers.
If you find that the tool is catching on the clay, one of two things could be wrong. Either the tool is not sharp, or you are trying to take too much clay off at one time.
If this happens check the tool for sharpness and try trimming off very thin layers.
At times your pot may come loose from the anchors. If this happens, stop the wheel immediately. Recenter the clay and re-anchor it.
Tip: I usually place my other hand gently on top of the pot while I'm trimming it. I barely touch the pot, just allowing my fingers to graze it while it spins. This allows me to feel if the pot it coming loose or moving at all.
Always be aware of how thick or thin your pot is. This will help you to avoid carving through it.
Trimming a Foot
Up until this point the steps for a lid or a foot are the same. However, if you are trimming a foot, it requires a different shape than a lid.
To carve a foot into the bottom of your pot, begin by marking where you want the foot to be. This can be done using your needle tool or a carving tool.
This is important as it gives you a guide to prevent you from carving the foot off of your clay pot projects.
Then carve out a layer of clay from the center of your pot out to the inside of the foot. Carve as many layers as necessary to give your pot the shape and weight that you want.
Finally, carve off any excess clay to the outside of the foot. This will allow you to further refine the shape and weight of your clay pot projects.
Tip: If your clay is soft enough, you can gently smooth your finger along the edges of the foot as the wheel spins. This will polish the foot, leaving it really nice and smooth (unless you have a really rough clay).
That's it. Let your pot dry and you're ready to
bisque fire
your pot. Thanks for learning how to trim your clay pot projects. Happy Potting.
If You Like This Page You Might Like:
Pottery Supplies and Tools
Ceramic Kilns - Types and Use
Making Large Coffee Mugs
Return From Clay Pot Projects - Trimming
To Learn Throwing
Return From Clay Pot Projects - Trimming
To Pottery on the Wheel Home
Enjoy this page? Please pay it forward. Here's how...
Would you prefer to share this page with others by linking to it?
- Click on the HTML link code below.
- Copy and paste it, adding a note of your own, into your blog, a Web page, forums, a blog comment,
your Facebook account, or anywhere that someone would find this page valuable.


