|
Ceramic GreenwareYou can find ceramic greenware for sale, or make it yourself. With the right supplies, you can do a bisque firing, and your own pottery glaze painting to complete your project. The firing process includes three phases. The first phase is ceramic greenware. Then comes the bisque firing, and finally, the glaze firing.
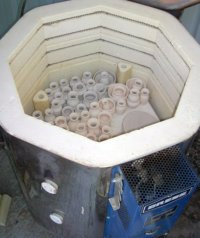
Greenware - is a pot that has been formed from clay and has not yet been fired. It can still be wet, or it can be completely dry. To the right are greenware pots being loaded into the kiln to be bisque fired. If you look closely you can see how they are packed in very tightly, even touching each other and the kiln posts. You can also see that some have been stacked carefully inside one another. This can only be done with greenware because it has not been glazed yet.
Before FiringThis is the last opportunity to modify your pot before it is fired and hardened. Most carving and trimming is done when the clay is leather hard, which is part of the greenware phase. Before firing the greenware, be sure there are no unwanted bumps, blemishes or sharp edges. These should be gently scraped or sanded off. They can still be removed after the pot has been fired, but it require a great deal more effort. Check for any cracks in the bottom and on handles and attachments. Determine how bad they are. If they are small, you can paint some slip mixed with vinegar into the crack to seal it. Unfortunately, if they are already large at this point, they are only going to get worse. As clay is dried and fired it continues to shrink, which will worsen any cracks. If the crack is too large to save, it is often best to abandon the pot while it can still be recycled into usable clay.
Drying TipsThorough drying at this stage is essential. Most pots benefit from being dried upside down so the base can dry completely. There are a couple of ways to determine when the pot is completely dry. Looking at the pot helps. Generally, the clay will lighten in color as it dries. With thicker pots, though, this can be deceptive, as the insides of the walls can still be damp. Temperature is a better way to tell. Clay that is still damp will be cooler to the touch than dry clay. Compare a totally dry pot with a partially dry pot and you'll feel the temperature difference. They might look the same, but the damp pot will feel cooler. Tip: If you want to carve a signature into the bottom, be sure to do it before firing, preferably when the pot is still damp.
Now your ceramic greenware is ready for a slow bisque firing to drive off all the moisture and harden the pot for glazing. Thanks for reading and Happy Potting.
Return From Ceramic Greenware |
Learn Right
The First Time
My paperback Bestseller,
Pottery on the Wheel for Beginners
is a complete beginners guide
to learning pottery.
It will
take you from
never having touched clay
to creating finished pottery
you can use every day.
Also read it on Kindle
Featured Pages
Choose Your Wheel
Thank you so much for
visiting my website!
Discover How I Made It!
Happy Potting!
- Steve


